# ATtiny 13 WS2812B-LED Fire-Effect Garden Lamp
This is how you can build a Garden Lamp based on an ATtiny13 and some WS2812B (Neopixel) LEDs.
The LEDs are Simulating a nice-looking Fire-Effect. This effect is generated using a random number generator.
It also features a LDR Light-Sensor to turn on the Lamp in the Darkness automatically.
In the code you can set a time after which the lamp automatically turns off, even if it is still dark.
# Software
The software is based on several different code snippets. You can find links to them in the Sources-Tab.
There are a view different configuration options (like on-time, color, ...), which can be done in the `config.h` file. They are well described in this file.
### Features
1. Fire-Effect turns on when LDR-value gets under `on_val` as defined
2. Second state is entered after the timeout `max_on_time` is reached. The LEDs light in the color, defined as `timeout_...`.
3. If it gets light again the LEDs light in the color, defined as `day_...`. If you want it to be off, set all values to 0.
## Program the ATtiny
### 1. Upload `ArduinoISP` sketch to the Arduino
You can find it in the Examples folder of the Arduino-IDE
### 2. wiring
I use a Arduino Nano to program the ATtiny, but also a Arduino UNO will do fine. Hook up the ATtiny like it is shown in the schematic:
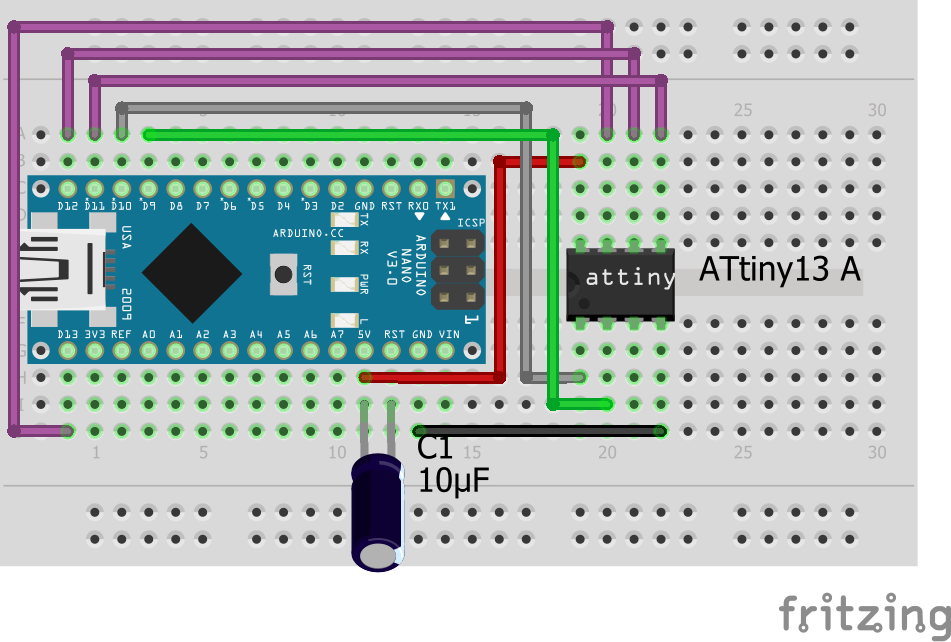 The capacitor is important because it prevents the Arduino from resetting itself while programming the ATtiny.
### 3. Download ATtiny13 support for the IDE
Add the URL `http://drazzy.com/package_drazzy.com_index.json` to the Additional Boards Manager URLs in the IDE Preferences. After that open the Boards-Manager, search for "DIY Attiny" and install it. Now you should find the Attiny13 and some other Attiny Boards in the Board menu.
### 4. Uploading
Open the code in the Arduino IDE and select the Attiny13 as the Board.
Select the following settings:
The capacitor is important because it prevents the Arduino from resetting itself while programming the ATtiny.
### 3. Download ATtiny13 support for the IDE
Add the URL `http://drazzy.com/package_drazzy.com_index.json` to the Additional Boards Manager URLs in the IDE Preferences. After that open the Boards-Manager, search for "DIY Attiny" and install it. Now you should find the Attiny13 and some other Attiny Boards in the Board menu.
### 4. Uploading
Open the code in the Arduino IDE and select the Attiny13 as the Board.
Select the following settings:
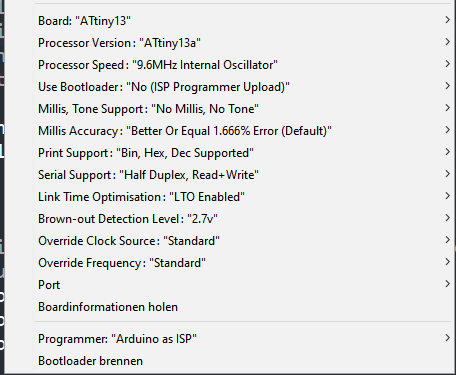 These settings are important:
- Processor-Speed to 9.6 Mhz
- Millis, Tone Support to "No Millis, No Tone"
**After that Press `Burn Bootloader` to make sure that these Settings are applied.**
Now you can upload the code by simply pressing **Upload**.
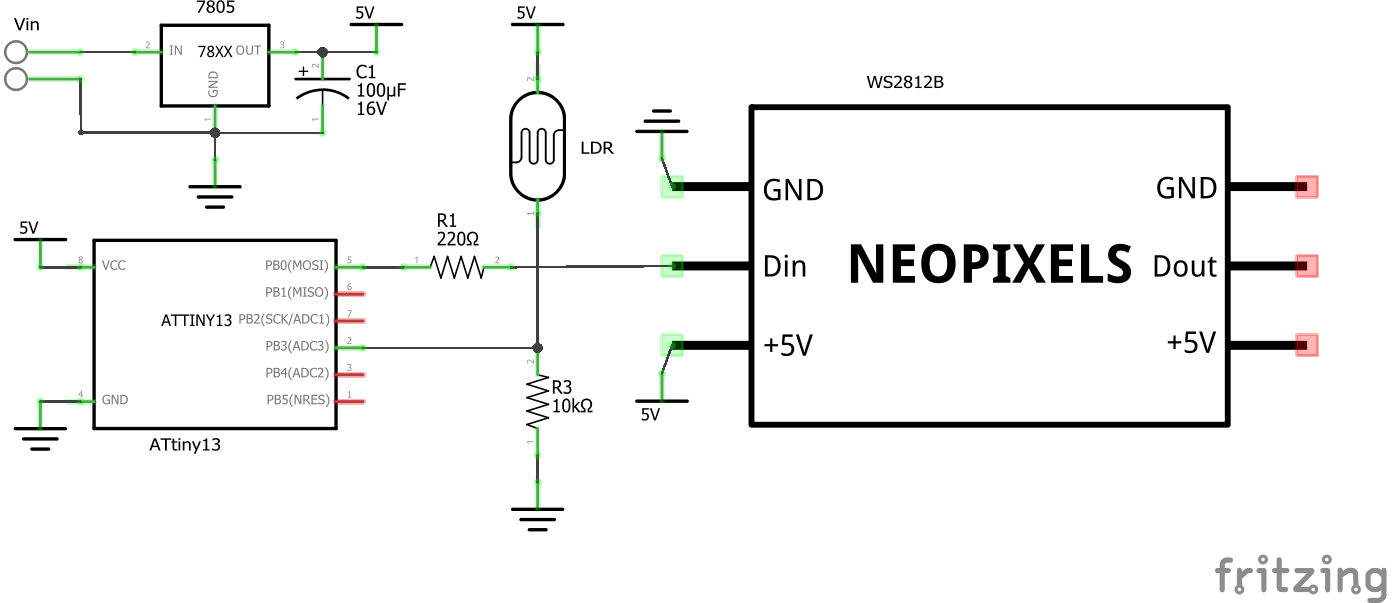
# Hardware
## Schematic
These settings are important:
- Processor-Speed to 9.6 Mhz
- Millis, Tone Support to "No Millis, No Tone"
**After that Press `Burn Bootloader` to make sure that these Settings are applied.**
Now you can upload the code by simply pressing **Upload**.
# Hardware
## Schematic
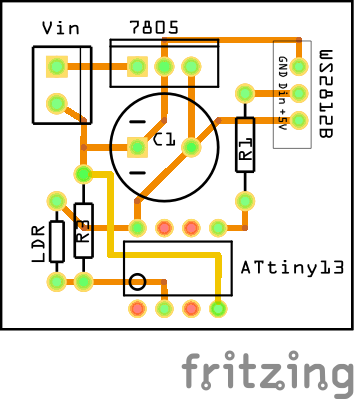
 ## PCB Layout
 ## ATtiny-Pinout
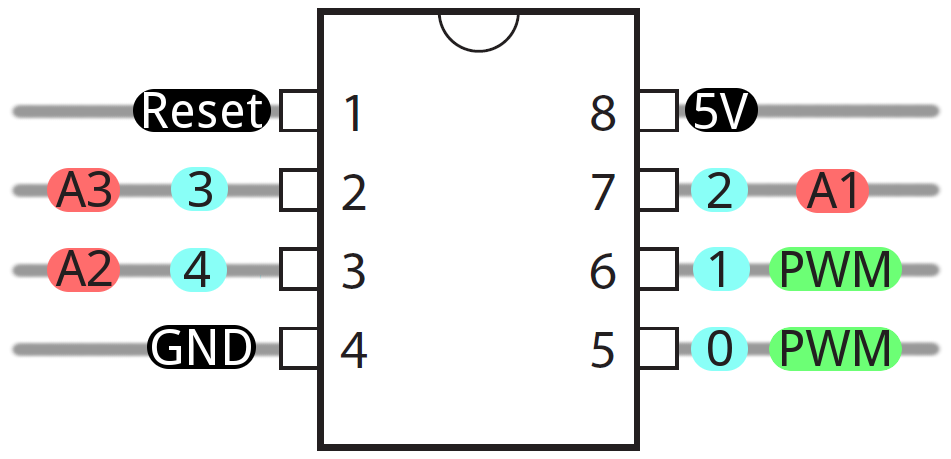
(Source: https://cdn.sparkfun.com/assets/f/8/f/d/9/52713d5b757b7fc0658b4567.png)
# Sources / Useful Links
You can find more detailed information here:
- Arduino ISP: https://www.instructables.com/Updated-Guide-on-How-to-Program-an-Attiny13-or-13a/
- Light sensor: https://www.elec-cafe.com/attiny85-light-sensor-switch/
- Timer Interrupt: https://arduinodiy.wordpress.com/2015/06/22/flashing-an-led-with-attiny13/
- WS2812B Lib:
- https://blog.podkalicki.com/attiny13-controlling-leds-ws2811ws2812/
- https://www.instructables.com/Updated-Guide-on-How-to-Program-an-Attiny13-or-13a/
- Random number gernerator lib:
- https://blog.podkalicki.com/attiny13-pseudo-random-numbers/
- https://github.com/lpodkalicki/blog/tree/master/avr/attiny13/009_lightweigth_prng_based_on_lfsr
- Fire Effect:
- https://codebender.cc/sketch:271084#Neopixel%20Flames.ino
- WS2812FX-Lib, "Fire-Flicker" Effect: https://github.com/kitesurfer1404/WS2812FX
### I hope you like this project!
This work by Dustin Brunner is licensed under CC BY 4.0


Dieses Werk von Dustin Brunner ist lizenziert unter einer Creative Commons Namensnennung 4.0 International Lizenz.